Wood workpieces are processed using special turning equipment. Using this type of apparatus allows you to perform various operations with high precision. If necessary, you can make a wood lathe with your own hands. This will save finances. To manufacture this device, you must familiarize yourself with its design features and take advantage of the advice of specialists.

The design of a homemade wood lathe can be extremely simple, but in order to obtain the desired result, you should thoroughly understand its specifics and application features
Content
Wood lathe device
This unit includes several main components. Each of them has a specific function. To make a homemade device, you will need to familiarize yourself in more detail with the structure of these elements.

A homemade lathe, which is made by hand, will significantly save on the purchase of such expensive equipment.
Stanina. The basis of any machine, including woodworking. This unit ensures the stability of the structure on the working surface, and also helps to fix the individual elements of the machine. Thanks to the frame, all the components are in the right places.
It is important to remember that stationary devices have a larger frame equipped with legs. In turn, the desktop units have a more compact base, which makes them mobile. When manufacturing a woodworking machine with your own hands, you need to pay special attention to this unit, since the accuracy and efficiency of the structure as a whole depends on it.
Headstock. This unit performs a very important function: it ensures the rotation of the wooden blank during its processing. The workpiece is fixed in a chuck located in the spindle shaft. It is worth noting that some small-sized machines include a headstock that can move along the guides of the base (bed). Its movement allows you to adjust the location of individual parts relative to each other.
When the part is being machined, the headstock of the lathe is securely fixed. Models that are stationary often combine this element with the bed, which makes it completely motionless.

Wood lathe diagram
Tailstock. This node, which is part of the woodworking structure, is not static. It performs a very important function: it fixes the blank in the desired position during its processing. Clamping the workpiece by means of the rear assembly takes into account its clamping to the chuck. Due to the fact that the tailstock is able to move freely along the guide elements of the bed, fixation and processing of parts of different lengths is provided.
Note! The tailstock must be in line with the spindle shaft.
Caliper. A very important structural element due to which the cutter movement is realized. Moreover, the latter can have a different location in relation to the spindle. In most self-made devices of this type, this function is performed by a handcuff, securely fixed in the working position.
This part of the machine is capable of moving along the guides of the base (bed). Small tabletop devices usually involve the use of an element such as a cutter rest.

The support of the universal lathe is designed to move the fixed cutter along the spindle axis
Thus, both a serial and a home-made machine is a rather complex design. Any unit for processing wood includes several interconnected nodes. Before making a wood lathe with your own hands, you need to clearly understand the purpose of its components.
How to make a wood lathe: making the bed
In serial devices, the bed is in most cases made of cast iron. This material is distinguished by its mass. For a homemade unit, you should choose a less heavy option. For example, angles made of rolled corner steel can be chosen as the basis for the future design. The recommended length of the segments is 125 cm.
The length of the bed can be increased, but this action will require intervention in other parts of the woodworking unit. Before making it, it is recommended that you draw up a plan on paper. And you can also take a ready-made drawing on the profile site, which will help in assembling a wood turning machine with your own hands.
Let's consider step by step the algorithm of actions for the manufacture of this unit. First of all, it is necessary to place the corresponding corners on a horizontal surface (open side to each other). Then it is recommended to place calibrated liners between them, which will allow you to maintain the desired distance of 4.5 cm.

The components of a homemade lathe are placed directly on the bed
Next, you need to connect the guides. For these purposes, the same corners are most often used, differing only in size (19 cm). It is recommended to mark the points at which welding will be performed. The lintels are located near the edges of the long corners. The next step is the welding itself.
Helpful information! The bed of any homemade wood machine is the basis of the structure, so its installation is very important. Any violation in the future will affect the efficiency and accuracy of the do-it-yourself unit.
Then you need to fasten another jumper of the same size. It should have cutouts for long corners. After installation of this part, a cell must form under the headstock spike. The dimensions of this geometric element require precise adherence. 4.5x16.5 cm is enough to install a standard headstock spike.
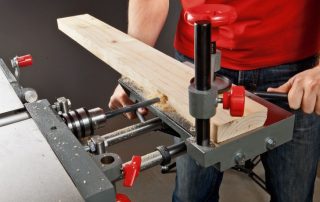
DIY woodworking machine: how to make a handyman
Traditionally, this detail includes two components.They are made of steel corners. Standard dimensions of workpieces for welding – 5 and 3 cm. The joining of these elements is done by welding (in length). The result is two sections, which should be 26 and 60 cm long.

A hand-tool on a lathe - needed for an emphasis incisors when working with wood
The short element is used as a customizable base of the bracing. Moreover, one of the corner shelves must be cut at an angle so that 11 cm of the intact profile remains. Before performing the same manipulation on the other wing, it is necessary to retreat from the edge by 6 cm.The angle itself in the second case remains straight.
Next, you need to complete the reciprocal frame of a homemade woodworking machine. A steel plate is suitable for the manufacture of this element. In the next step, it is necessary to complete the guide element and its clamp. As a material for these purposes, you can use an ordinary inch pipe. In it, you need to make a longitudinal slot with a grinder. Masters advise not to make this part longer than 15 cm.
Then the guide sleeve is installed in the corner of 2.5 cm. The cut made by the grinder should be perpendicular to one of the shelves. Further, the structure must be fixed in the clamp and connected using welding equipment. After that, the tube is covered with a second corner and is connected to it in the same way.
The finished guide piece is joined by welding to the protruding angle flange. For final fastening, it is necessary to weld a nut to the rail, and equip the second part with a screw. Also, do not forget that on the reverse side you need to perform additional fixation of the structure. To do this, you can weld a metal rod to its individual parts. It will give the structure strength and rigidity.

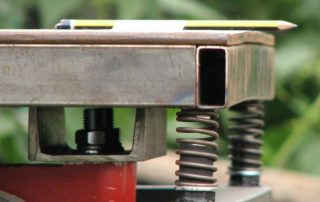
Diagram of a hand-tool for a lathe on an eccentric clamp
The hand-arm is fixed on a piece of reinforcement (smooth), which should have a diameter of 2 cm. Such a rod is fixed on the back side of the corner approximately in its center. At the end, it is necessary to connect the reinforcement with a long piece (60 cm).
Homemade lathe wood: drive selection
The drive must be powerful enough to handle wood. When buying this device, it is advisable to pay attention to the standard models. Their power ranges from 1200 to 2000 watts. This is quite enough for processing all kinds of parts at home. The most commonly used drive with a power rating of 1200 watts.
Induction motors are often used in homemade wood lathes. It will not work to make this device with your own hands. Another characteristic that is common among drives installed on self-made machines is three-phase.
Note! When assembling such equipment at home, it is rather difficult to acquire an engine that would have the required speed. However, if desired, this indicator can be adjusted by changing the diameter of the pulleys.

A homemade lathe must have enough power to process wood products
It is recommended to equip the frame with a special plate when mounting the drive. It is fixed on the door canopies and provides a tighter grip on the strap. Some craftsmen install a pedal on the platform, which allows you to change the number of revolutions per second while processing a wooden blank.
DIY lathe: headstock and tailstock
To manufacture these units, you must have access to a metalworking machine. If this is not possible, it is recommended to buy ready-made structural elements.The headstock of the woodworking unit includes two housings, which are classified as bearing.
When self-assembling the machine, it is important to remember that the height of the spindle axis above the base should be no less than 12 cm. This indicator affects the size of the front assembly. The most suitable in this situation is a bearing block with a height of 7 cm. The shaft itself can be made on a metal-working device. Its diameter should not be less than 4 cm.
In turn, the procedure for making the tailstock of a wood lathe with your own hands is less complicated. This module includes 4 elements, including:
- base;

The headstock is designed to accurately support and move the workpiece being machined relative to the cutting tool or surface
- guide (outer);
- inner tube;
- drive screw.
The base is recommended to be made of a steel corner, the height of which should not exceed 10 cm. To create a guide, you can use a tube measuring 4x15 cm.A special plug with a hole (0.8 cm) must be installed in its back. In this case, the inner tube will have dimensions of 2 cm. Next, you need to make a drive screw. The thread for the nut in the inner tube is applied to it.
It is also worth noting that the headstock and tailstock must be in line. Otherwise, further design of the woodworking machine will not bring any results. The headstock is fixed to the bed in the same way as the handguard.
Making cutters for a wood lathe with your own hands
If necessary, these functional elements can be purchased in a specialized store or ordered via the Internet. However, many craftsmen prefer to make these devices on their own. The most popular cutting elements today are reyer and meisel. They are quite simple to perform on a sharpening machine.

Turning tools: A - with a semicircular blade for rough turning; B - with a straight edge for fine turning; B - shaped; Г - machine checkpoint
In order to make these cutting elements, you need a blank. You can use old tools (for example, a file) as it. The metalworking unit allows you to quickly sharpen this blank. Forming is performed at two points: where the blade will be located and the tail.
Related article:
Wood lathe: device, characteristics and model overview
Review of popular models of woodworking machines. Advice on selection and rules of use.
The next step in making a wood cutter with your own hands is stuffing a turned handle with a retaining ring. Thus, the independent manufacture of cutters for the woodworking unit is carried out.
Note! As the initial material for the implementation of these functional elements, you can use not only files, but also rasps or reinforcement.
It is also important to remember that a homemade tool must first be tested on soft woods. Such a check will determine how well the cutter is made and whether it is advisable to use it when working with hard rocks.
Wood turning and milling machine do it yourself
From a constructive point of view, serial units of this type are quite complex. This is due to the fact that they are equipped with a CNC. It is impossible to recreate such a system at home, therefore experts recommend making the most simple milling units.

Experienced home craftsmen prefer not to buy expensive factory equipment, but make it a simple analogue with their own hands
First of all, it is recommended to complete a drawing of a lathe on wood.With your own hands, you can draw a simple plan that will include a list of materials and a diagram of the future design.
When making such a unit, it is not recommended to use the classic version, in which the blank is located between the front and rear nodes. It is also desirable to discard the functional part represented by the incisor. In this case, a manual router will act as a functional element. The advantages of this design are in its economy and increased functionality.
Turning and milling equipment used for woodworking includes several components. You can do them yourself. First, you need to make the base of the unit (bed). For its manufacture, as a rule, wooden blocks are used. This type of support is characterized by high strength and rigidity.
Then the front knot is fixed, which should not move. The tailstock, on the other hand, must change its position by moving along the mounting panel.

The simplest homemade lathe for processing wood blanks consists of several main parts: a frame, a headstock and a tailstock, a leading and a driven center
As for the swinging of the electric motor, one common method is used to increase its efficiency. A disc of a smaller diameter is mounted on the drive shaft, and a larger one on a similar element of the front unit. The interaction in this case is carried out by means of a belt drive.
As mentioned above, in this case, a milling cutter serves as a tool for a wood turning stock. It is mounted at the top of the support on a do-it-yourself platform. It is important to remember that in self-made devices it is impossible to connect a functional element to the CNC. Thus, it is in the indicated order that the simplest unit with a milling cutter is manufactured, equipped to a minimum.
Diy wood lathe with a copier
A copier is a device that allows you to thread a workpiece according to a given template. Thanks to it, it becomes possible to produce the same type of parts at a high speed. A copying machine for wood avoids painstaking work and is most often used in home workshops.
For self-production of a copying element, you can take a manual router as a basis. It must be placed on a plywood board, the thickness of which should not be more than 1.2 cm.The standard dimensions for such a workpiece are 20x50 cm.

The lathe-copying machine allows you to make monotonous parts from wood with your own hands
Helpful information! The productivity of the milling and copying machine for wood allows you to use it not only at home, but also in small industries.
Then it is necessary to drill holes for the fixing elements, and also install small bars that will serve as a support for the functional part. Next, the cutter must be placed between the clamps and secured with ordinary screws. After that, it remains to place a bar (7x3 cm) on the machine. With its help, the stencil is attached.
This is how you make a wood lathe with a copier with your own hands. Videos that allow you to visually understand this issue can be viewed on the Internet. It is not that difficult to make this device. All work comes down to a simple upgrade of a conventional unit.
DIY mini wood lathe
In a home workshop, you can make a smaller device. A mini wood lathe with your own hands has a size from 20 to 30 cm.In order to make it, you will need an old motor and a power supply from an unnecessary Soviet-style radio tape recorder. Such a small device is perfect for turning small pieces of wood (for example, handles).

You can start assembling the mini machine in any sequence, the main thing is to follow the sequence when assembling its parts
And also this device can be used as a mini lathe for metal. It is not difficult to make such a small apparatus with your own hands, which will allow you to give the desired shape not only to wooden blanks, but also to products made of tin and even aluminum.
In this case, there is a certain algorithm of actions that should be followed. First of all, you need to take a metal sheet and prepare a box that will act as a case for the engine. Experts recommend choosing sheets with a thickness of 1-1.5 mm. The plate must be bent in the shape of the letter "P" and make a hole in it for the shaft.
Next, you need to make several elements at once from a wooden bar. The thickness of the material should be approximately 2-3 cm. First, the supporting casing is made, and then the supporting parts for the motor and the rear assembly.
The next step is to cut the square pieces of wood and glue the "tower" out of them. Then you need to fix the resulting structure with self-tapping screws (4 pcs.). At the end, it remains only to mark the point of the holder, the function of which is performed by the self-tapping screw, and fix the faceplate from the motor side.

Mini woodworking machine greatly facilitates the process of woodworking, makes the work more fun
This instruction allows you to make a small machine, the dimensions of which will not exceed 25 cm. Of course, such a device will not work for serious work. But for performing small tasks, such a device is the most suitable option, which is very easy to assemble with your own hands. The mini lathe consumes very little electrical energy, which is also a plus.
DIY wood lathe from a drill
If you have a workbench in your workshop, then the process of making a woodworking unit is greatly simplified. In this situation, there is no need to search for materials for the bed, in its direct assembly. An ordinary drill, fixed on a flat, horizontal surface of the workbench, is capable of replacing the turning device.
Helpful information! The drill performs several functions at once, which in a conventional machine fall on the front unit, as well as the rotation drive.
The drill is fixed by means of a clamp and a clamp, which must be fixed on the neck of the electronic instrument. However, the rest of the components necessary for processing wooden blanks will still have to be assembled.

A do-it-yourself lathe from a drill will save on the purchase of several processing devices of a specialized type
First of all, this concerns the tailstock, which acts as a stop. This assembly is fixed parallel to the drill and, as a rule, is made of wooden blocks. For reliability, it is also recommended to use an adjustment screw, the head of which is sharpened for a cone.
Further assembly of a lathe from a drill is quite simple. The handrail can be replaced with an ordinary wooden block, which is fixed on a horizontal plane by means of a clamp.
The main rule when assembling such a simple structure is to observe the centering of the spindle rotation axis and the adjustment screw on the rear assembly. For example, you can temporarily assemble a lathe from an ordinary drill. Moreover, on such a machine, you can both perform wood processing and produce blanks from soft metals (aluminum, copper, etc.).
Rules for using a homemade wood lathe
Experts recommend studying training materials that will allow you to understand the operational nuances of a do-it-yourself wood lathe. Videos on this topic can be easily found on the Internet.

By following simple recommendations, you can keep the original parameters of the lathe for a long time
It will also be useful to consider the basic rules that should be followed while working on such equipment. Each of them must be performed without fail. For example, before you start processing a workpiece, you need to make sure whether it is suitable for this. The blank should not have knots, cracks and wood deformations.
Placing the workpiece also requires a certain procedure. Fixation is carried out by means of special fasteners, which are located on the shaft of the front assembly and on the rear bar.
Separately, it should be said that the processing accuracy is influenced by the rotation speed of the blank. Speed regulation is done by changing the position of the drive belt in the pulley channels. The woodworking process requires care. It is recommended to measure a product turned with a functional element.
During work, you must not forget about overalls. Goggles are used to protect the eyes from chips and dust. And also before starting work, it is necessary to check the health of individual elements of the equipment.

The machine may be operated by someone who is familiar with its operation, maintenance and warned of possible dangers
The answer to the question of how to make a wood lathe at home will save you finances. Self-assembly of this unit requires preliminary calculations, drawing up a diagram, and also care. Compliance with the instructions is the basic rule that must be followed when designing such a device. A homemade unit can be a useful addition to any home workshop.